


.svg)
10 Drip Campaign Examples That Convert
.avif)
A drip campaign is an automated email sequence triggered by subscriber behaviour, a specific date, or a position in the customer journey, with each email sent at a pre-set interval or in response to an action the recipient takes. According to Omnisend's 2025 ecommerce marketing report, automated emails accounted for just 2% of total email sends in 2024 yet drove 37% of all email-generated sales. That ratio tells you everything about why drip campaigns matter. Two percent of the volume. Thirty-seven percent of the revenue.

Most marketers still spend the bulk of their time on broadcast campaigns, the one-off sends that go to the whole list. And those campaigns have their place. But the drip campaign, the automated email sequence running quietly in the background, is where the serious revenue lives. This guide covers ten specific drip campaign examples with email-by-email breakdowns, subject line templates, CTA guidance, and the segmentation logic that makes each one work.
What Is a Drip Campaign (And Why It Works)?
A drip campaign is a series of automated emails sent to a contact based on a trigger, an action they took, a date, or a segment they belong to, with the sequence designed to move them through a defined stage of the customer journey.
The phrase "drip" refers to the drip-feed delivery: emails arrive one at a time, spaced strategically, rather than in a batch. Each email in the sequence has a single goal. The drip campaign as a whole has a broader objective, whether that is converting a trial user, recovering an abandoned cart, or reactivating a lapsed subscriber.
What makes the email drip campaign more effective than a standard broadcast? Timing and relevance. A triggered email arrives when the subscriber has just done something meaningful. They signed up. They browsed a product. They stopped opening emails. That behavioural context makes the message feel personal, because it is personal. It is responding to what they actually did.
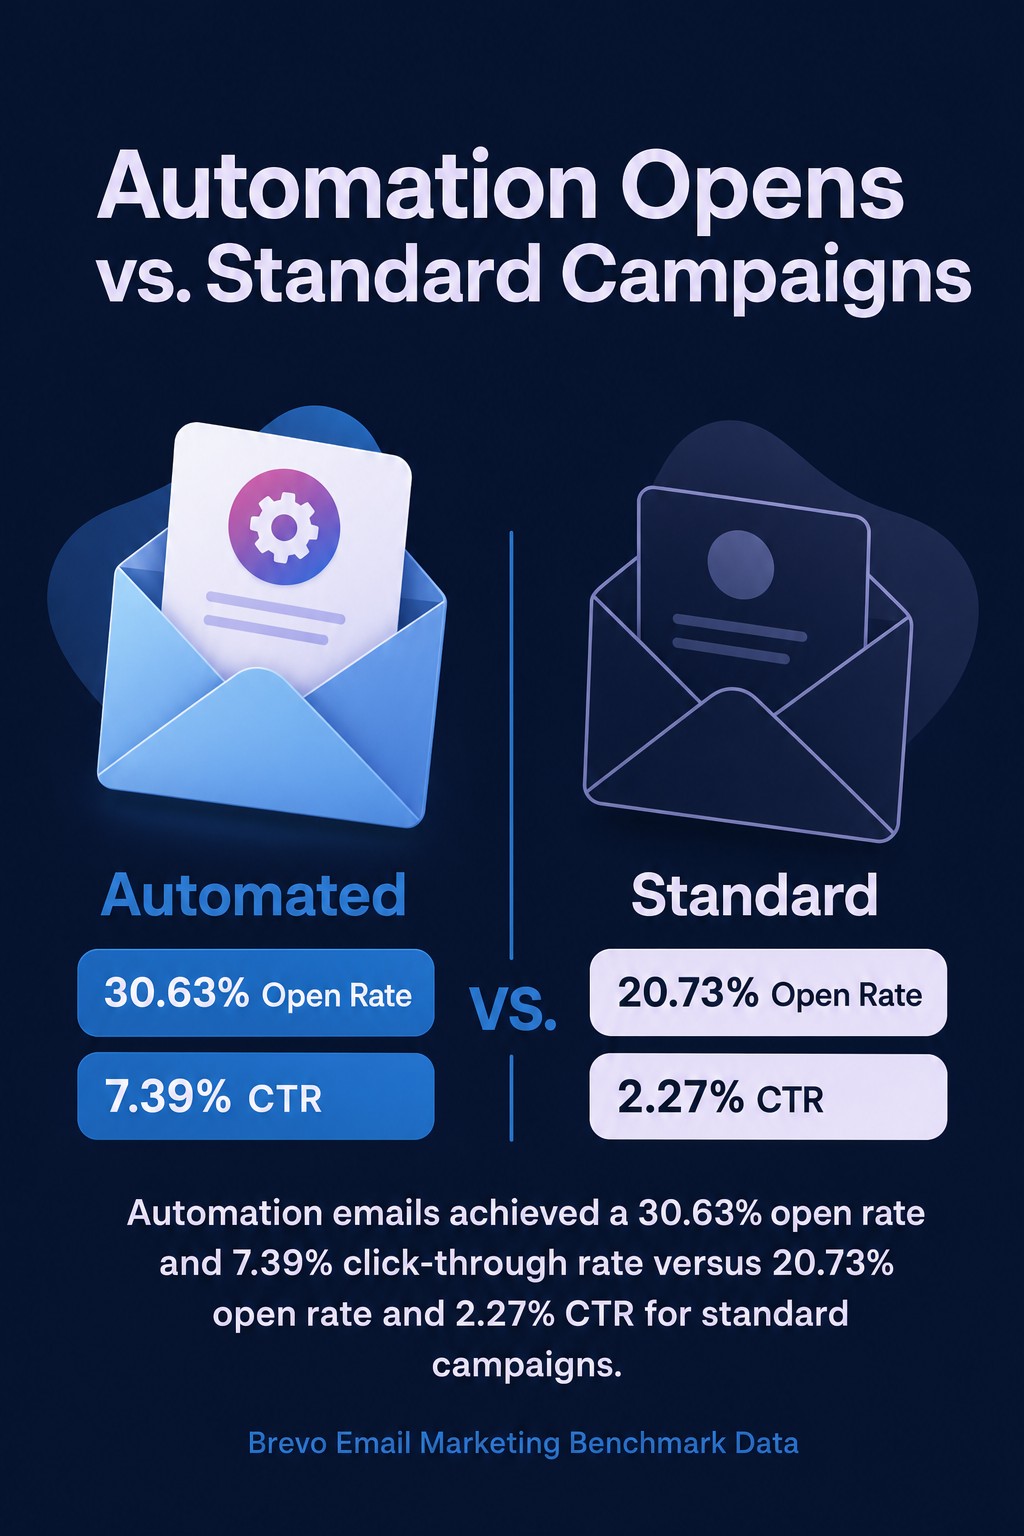
Brevo's email marketing benchmark data shows automation emails achieved a 30.63% open rate and 7.39% click-through rate versus 20.73% open rate and 2.27% CTR for standard campaigns. The performance gap is not marginal. It is the difference between a sequence your subscribers actually engage with and one they ignore. And that gap compounds across every email in the sequence.
The email automation trigger is the engine of the drip campaign. Common triggers include form submission (welcome series), cart abandonment, purchase confirmation (post-purchase flow), inactivity threshold (re-engagement), and date-based events like birthdays or subscription anniversaries. Each trigger fires the email sequence at the moment it is most likely to land.
Want a full map of the automations worth building? Our email automation toolkit covering 100 campaign flows goes through every trigger type in detail.
Benefits of Email Drip Campaigns
Email drip campaigns generate revenue at a rate that standard broadcast sends cannot match, primarily because they reach the right subscriber at the right moment with a message built for their specific stage in the customer journey.
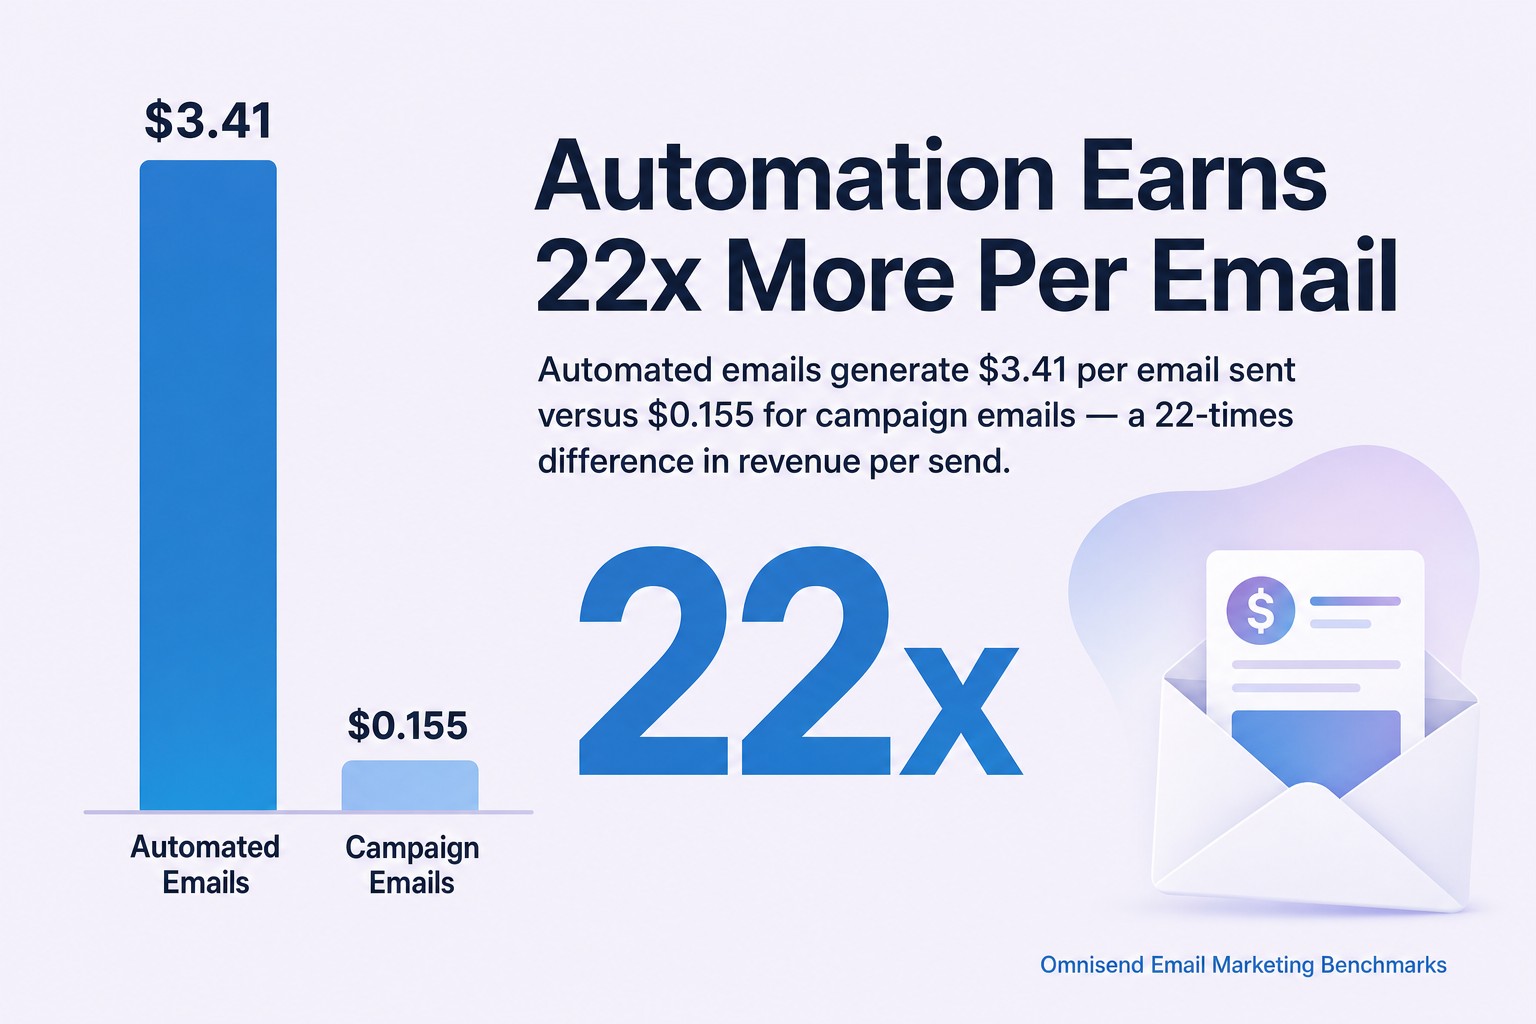
The revenue-per-email figure is the clearest illustration. Omnisend's email marketing benchmarks put automated emails at $3.41 per email sent versus $0.155 for campaign emails. That is a 22-times difference in revenue per send. Put it another way: every automated email in your drip campaign is doing the work of roughly 22 broadcast emails.
Beyond raw revenue, there are three practical benefits worth naming.
Scalability. Once built, a drip campaign runs without manual input. A welcome email sequence fires for every new subscriber, whether you add ten contacts this week or ten thousand. The effort is front-loaded in setup, not replicated per send.
Segmentation by default. Drip campaigns are inherently segmented, because the trigger determines who receives them. A subscriber who abandons a cart gets the abandoned cart sequence. A new customer gets the onboarding email flow. You are not guessing at relevance; the behaviour defines it. Segmented campaigns drive a 760% increase in email revenue according to Mailmodo's email segmentation research. That is not a small lift.
Lead nurturing at scale. For B2B and considered-purchase brands, the drip campaign keeps prospects warm across a buying cycle that might span weeks or months. Companies that do lead nurturing well generate 50% more sales-ready leads at 33% lower cost, according to research compiled by Amra & Elma. The email drip campaign is the primary mechanism for that nurturing.
10 Email Drip Campaign Examples to Steal
The ten drip campaign examples below are ordered by where they sit in the customer journey, from first contact through to reactivation. Each includes a goal, the audience segment, the email automation trigger, timing, an email-by-email breakdown with subject lines, body copy direction, and CTA guidance.
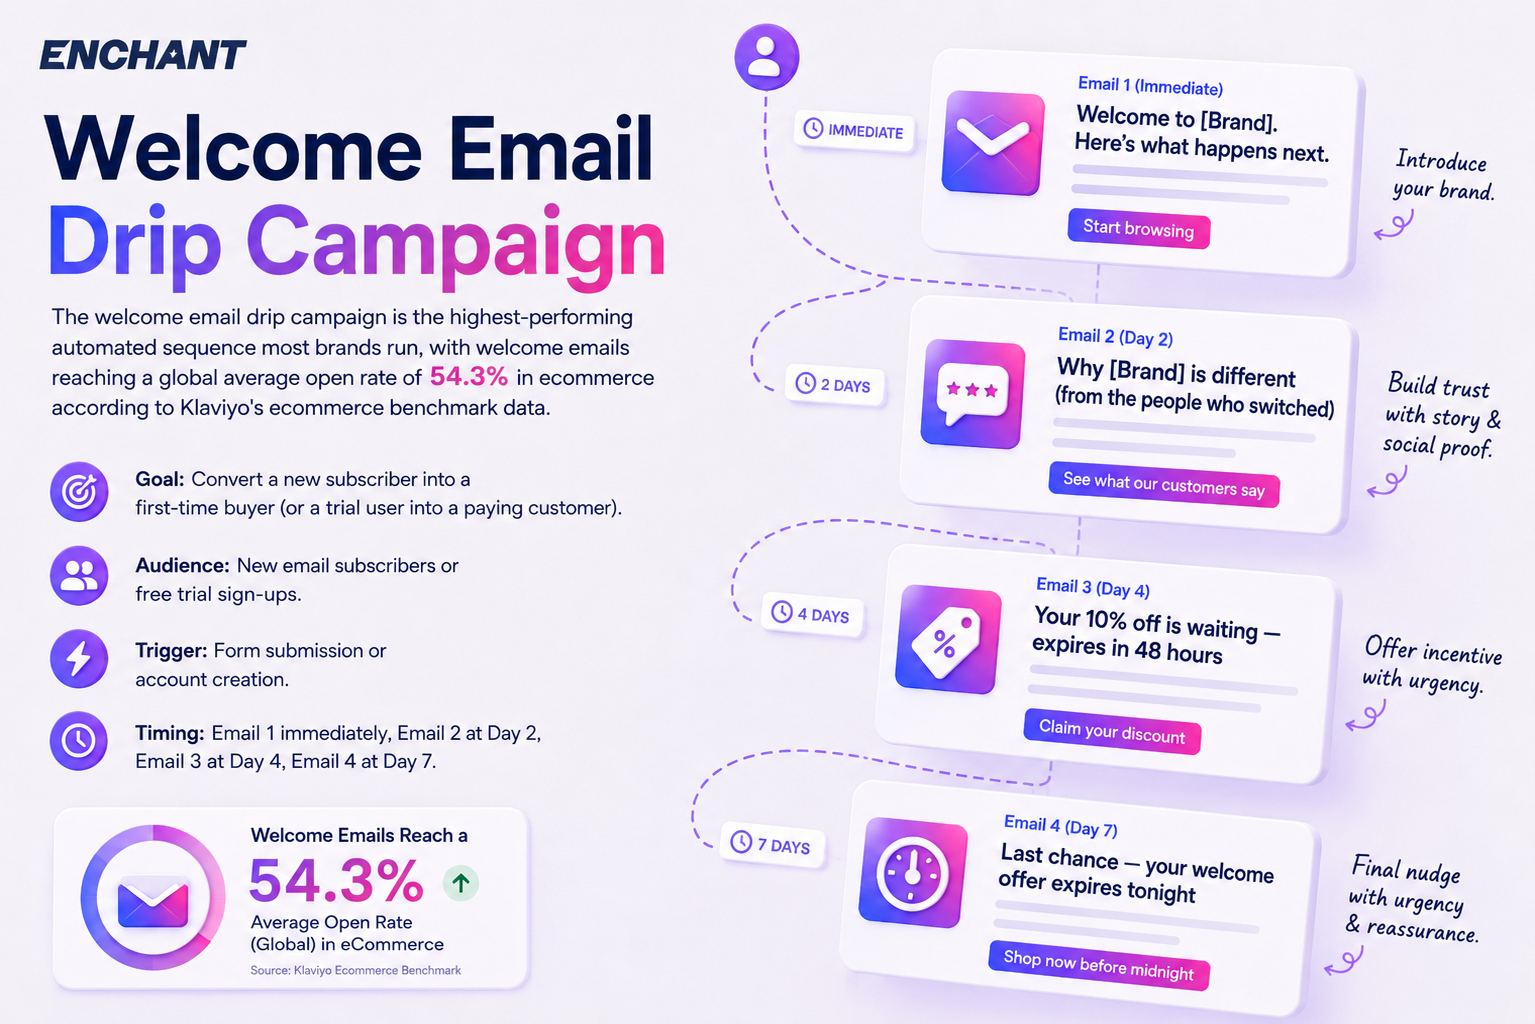
1. Welcome Email Drip Campaign
The welcome email drip campaign is the highest-performing automated sequence most brands run, with welcome emails reaching a global average open rate of 54.3% in ecommerce according to Klaviyo's ecommerce benchmark data.
Goal: Convert a new subscriber into a first-time buyer (or a trial user into a paying customer).
Audience: New email subscribers or free trial sign-ups.
Trigger: Form submission or account creation.
Timing: Email 1 immediately, Email 2 at Day 2, Email 3 at Day 4, Email 4 at Day 7.
Email 1 (Immediate) — Brand introduction
Subject: "Welcome to [Brand]. Here's what happens next."
Body: Deliver the lead magnet or confirm the account. Introduce the brand in two to three short sentences. No sales pitch yet.
CTA: "Start browsing" or "Activate your account."
Email 2 (Day 2) — Brand story and social proof
Subject: "Why [Brand] is different (from the people who switched)"
Body: Short brand story. Two or three customer reviews or a specific result (product outcome, client win).
CTA: "See what our customers say" linking to a reviews page or case study.
Email 3 (Day 4) — First purchase incentive
Subject: "Your 10% off is waiting — expires in 48 hours"
Body: Offer the incentive. Create urgency with a real expiry. One product category or hero product.
CTA: "Claim your discount" with a unique code or auto-apply link.
Email 4 (Day 7) — Last nudge
Subject: "Last chance — your welcome offer expires tonight"
Body: Urgency-led. Short copy. Repeat the discount. Address a common objection (free returns, easy sizing guide, money-back guarantee).
CTA: "Shop now before midnight."
At Enchant, our default welcome series spans email plus SMS plus push notifications across the first seven days. Email does the heavy lifting, but an SMS at Day 3 pushing the incentive consistently lifts click rates on that mid-sequence email. Channel-appropriate CTAs matter here: SMS goes to a landing page, not the full website.

2. Abandoned Cart Drip Campaign
The abandoned cart drip campaign targets the 70.22% of shoppers who leave without purchasing, a figure based on the Baymard Institute's meta-analysis of shopping cart abandonment, making it the single highest-intent email sequence in ecommerce.
Goal: Recover lost purchase intent and close the sale.
Audience: Subscribers who added to cart but did not complete checkout.
Trigger: Cart abandonment event (typically fired after 60 minutes of inactivity post-add-to-cart).
Timing: Email 1 at 1 hour, Email 2 at 24 hours, Email 3 at 72 hours.
Email 1 (1 hour) — Gentle reminder
Subject: "You left something behind."
Body: Show the abandoned item(s) with product image, name, and price. No pressure. This is a simple, helpful reminder.
CTA: "Complete your order."
Email 2 (24 hours) — Urgency and social proof
Subject: "Still thinking about it? Here's what other customers said."
Body: Two or three reviews of the specific abandoned product. Add low-stock messaging if genuine.
CTA: "Read the reviews and come back."
Email 3 (72 hours) — Incentive to close
Subject: "Here's 10% off — just for you."
Body: Offer the incentive. Make clear it is a one-time offer linked to the abandoned item.
CTA: "Claim your discount and complete checkout."
Abandoned cart email flows achieve an average open rate of 50.50% in Klaviyo according to Klaviyo's abandoned cart benchmark data. That open rate is meaningless if the CTA takes the subscriber to the homepage instead of directly to their cart. Every abandoned cart email CTA should pre-populate the cart. Every single one.
3. Lead Nurturing Drip Campaign (B2B)
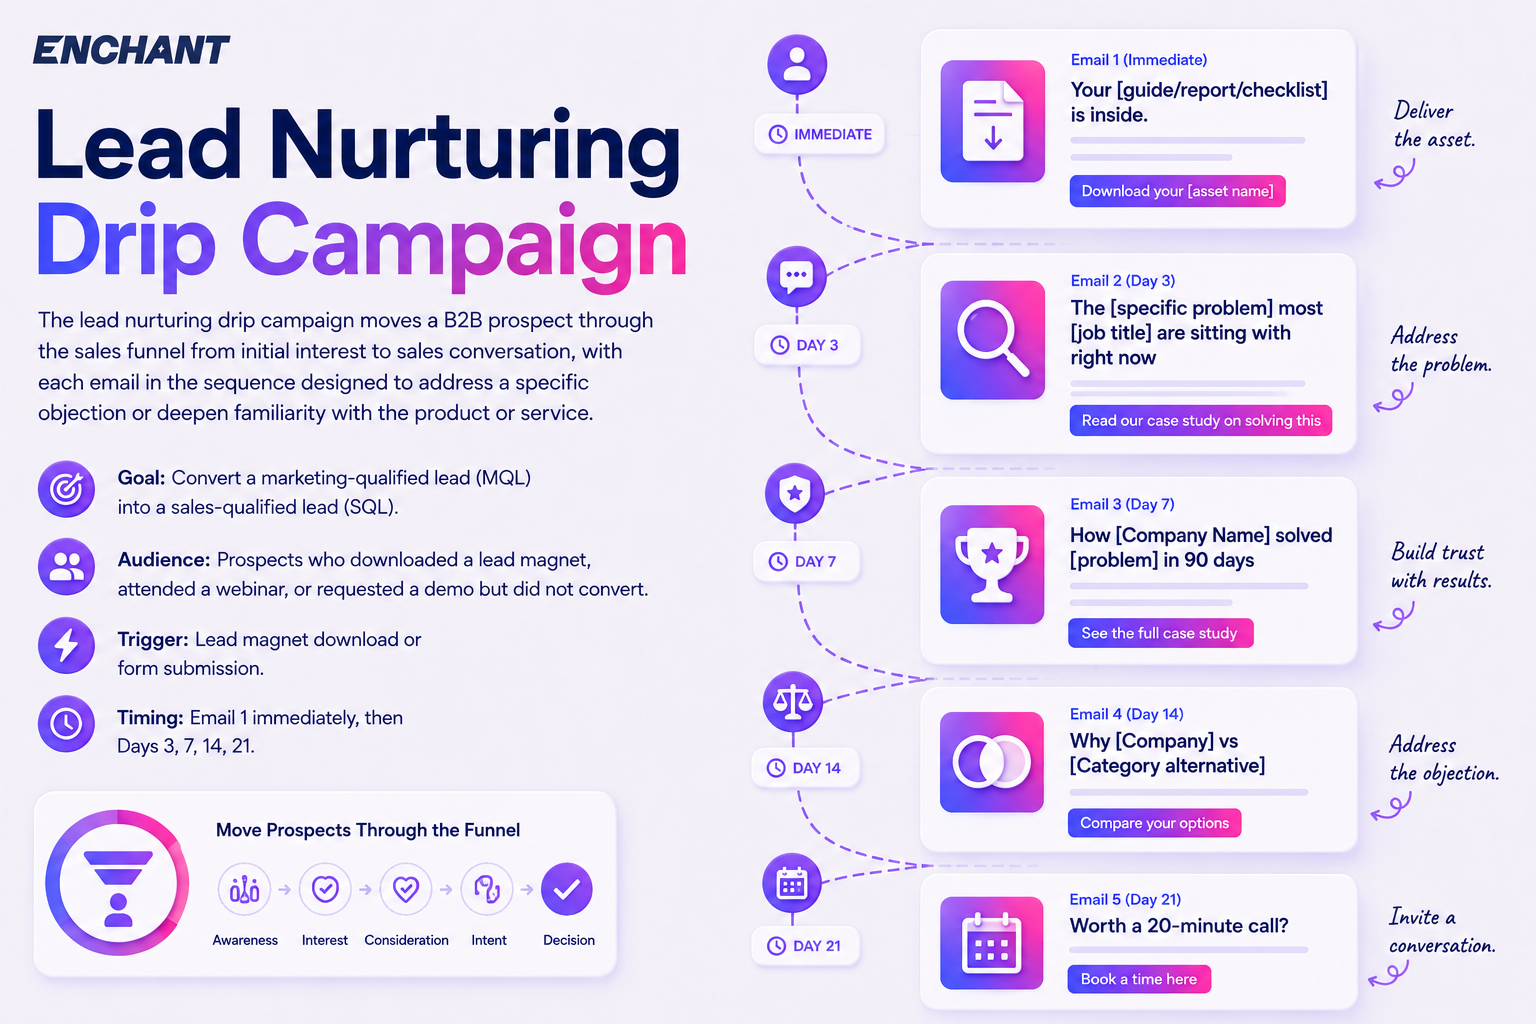
The lead nurturing drip campaign moves a B2B prospect through the sales funnel from initial interest to sales conversation, with each email in the sequence designed to address a specific objection or deepen familiarity with the product or service.
Goal: Convert a marketing-qualified lead (MQL) into a sales-qualified lead (SQL).
Audience: Prospects who downloaded a lead magnet, attended a webinar, or requested a demo but did not convert.
Trigger: Lead magnet download or form submission.
Timing: Email 1 immediately, then Days 3, 7, 14, 21.
Email 1 (Immediate) — Deliver the asset
Subject: "Your [guide/report/checklist] is inside."
Body: Deliver the asset. One sentence on what to do with it.
CTA: "Download your [asset name]."
Email 2 (Day 3) — The problem you solve
Subject: "The [specific problem] most [job title] are sitting with right now"
Body: Name the pain point the asset addressed. Show you understand their situation.
CTA: "Read our case study on solving this."
Email 3 (Day 7) — Social proof
Subject: "How [Company Name] solved [problem] in 90 days"
Body: A single client story. Specific result. One paragraph.
CTA: "See the full case study."
Email 4 (Day 14) — Differentiation
Subject: "Why [Company] vs [Category alternative]"
Body: Address the most common objection or alternative your prospect is considering. Be specific.
CTA: "Compare your options."
Email 5 (Day 21) — Soft ask
Subject: "Worth a 20-minute call?"
Body: Plain-text email. Short. Ask for a conversation, not a sale.
CTA: "Book a time here" linking to a calendar.
Lead nurturing email sequences work best when they are integrated with CRM data. In HubSpot, for example, you can branch the sequence based on which pages the prospect visited between emails. If they visited the pricing page on Day 10, Day 14's email should address pricing, not differentiation. That kind of behavioural trigger mid-sequence is what separates a performing lead nurturing drip campaign from a generic autoresponder.
For B2B-specific campaign architecture, our B2B email marketing campaign strategies guide covers the full nurture-to-conversion funnel.
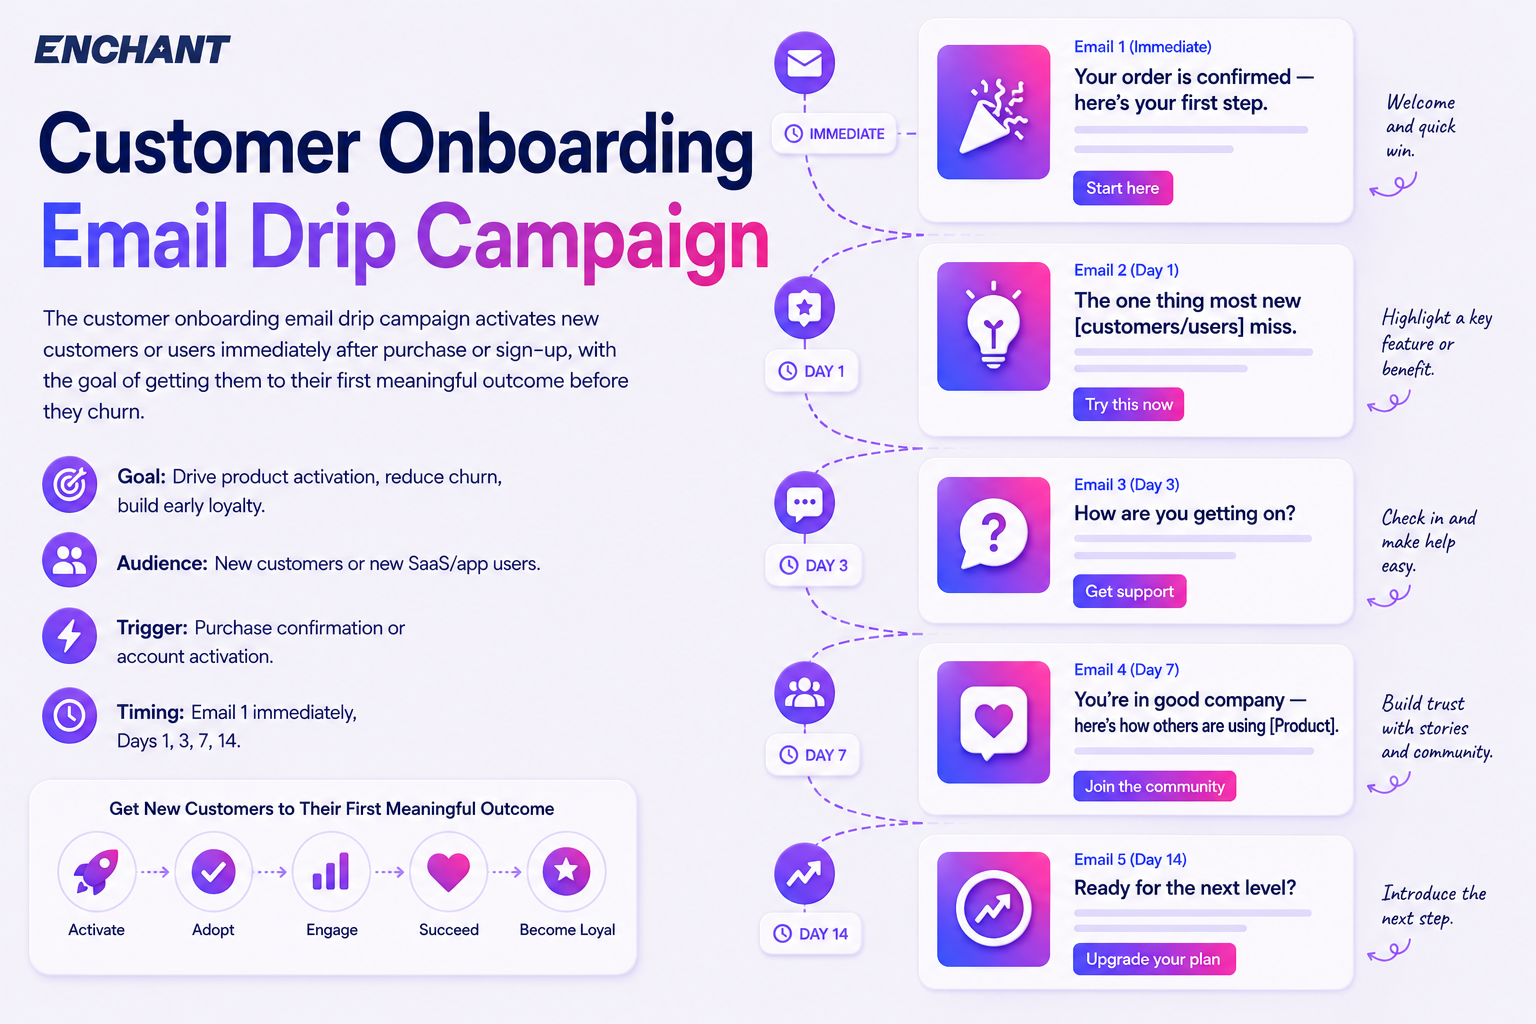
4. Customer Onboarding Email Drip Campaign
The customer onboarding email drip campaign activates new customers or users immediately after purchase or sign-up, with the goal of getting them to their first meaningful outcome before they churn.
Goal: Drive product activation, reduce churn, build early loyalty.
Audience: New customers or new SaaS/app users.
Trigger: Purchase confirmation or account activation.
Timing: Email 1 immediately, Days 1, 3, 7, 14.
Email 1 (Immediate) — Welcome and quick win
Subject: "Your order is confirmed — here's your first step."
Body: Confirm the purchase or activation. Give one specific action to take immediately. Do not overwhelm.
CTA: "Start here" or "Watch the 2-minute setup video."
Email 2 (Day 1) — Key feature or product benefit
Subject: "The one thing most new [customers/users] miss"
Body: Highlight a single, specific feature or usage tip that delivers early value.
CTA: "Try this now."
Email 3 (Day 3) — Progress check
Subject: "How are you getting on?"
Body: Ask a simple question. Link to the support centre, FAQ, or live chat. Make it easy to get help.
CTA: "Get support" or "Book an onboarding call."
Email 4 (Day 7) — Social community or community proof
Subject: "You're in good company — here's how others are using [Product]"
Body: One or two customer stories with specific outcomes. Community invitation if relevant.
CTA: "Join the community" or "Read their story."
Email 5 (Day 14) — Upsell or expansion prompt
Subject: "Ready for the next level?"
Body: Introduce a related product, upgraded tier, or add-on. Frame it as the natural next step after their first two weeks.
CTA: "Upgrade your plan" or "Add this to your order."
The onboarding email drip campaign is the sequence brands most frequently underinvest in. Getting someone to buy is one thing. Getting them to the point where they feel they could not do without you is where lifetime value is built. That is the job of onboarding, and most brands treat it as a single confirmation email. That is a mistake.
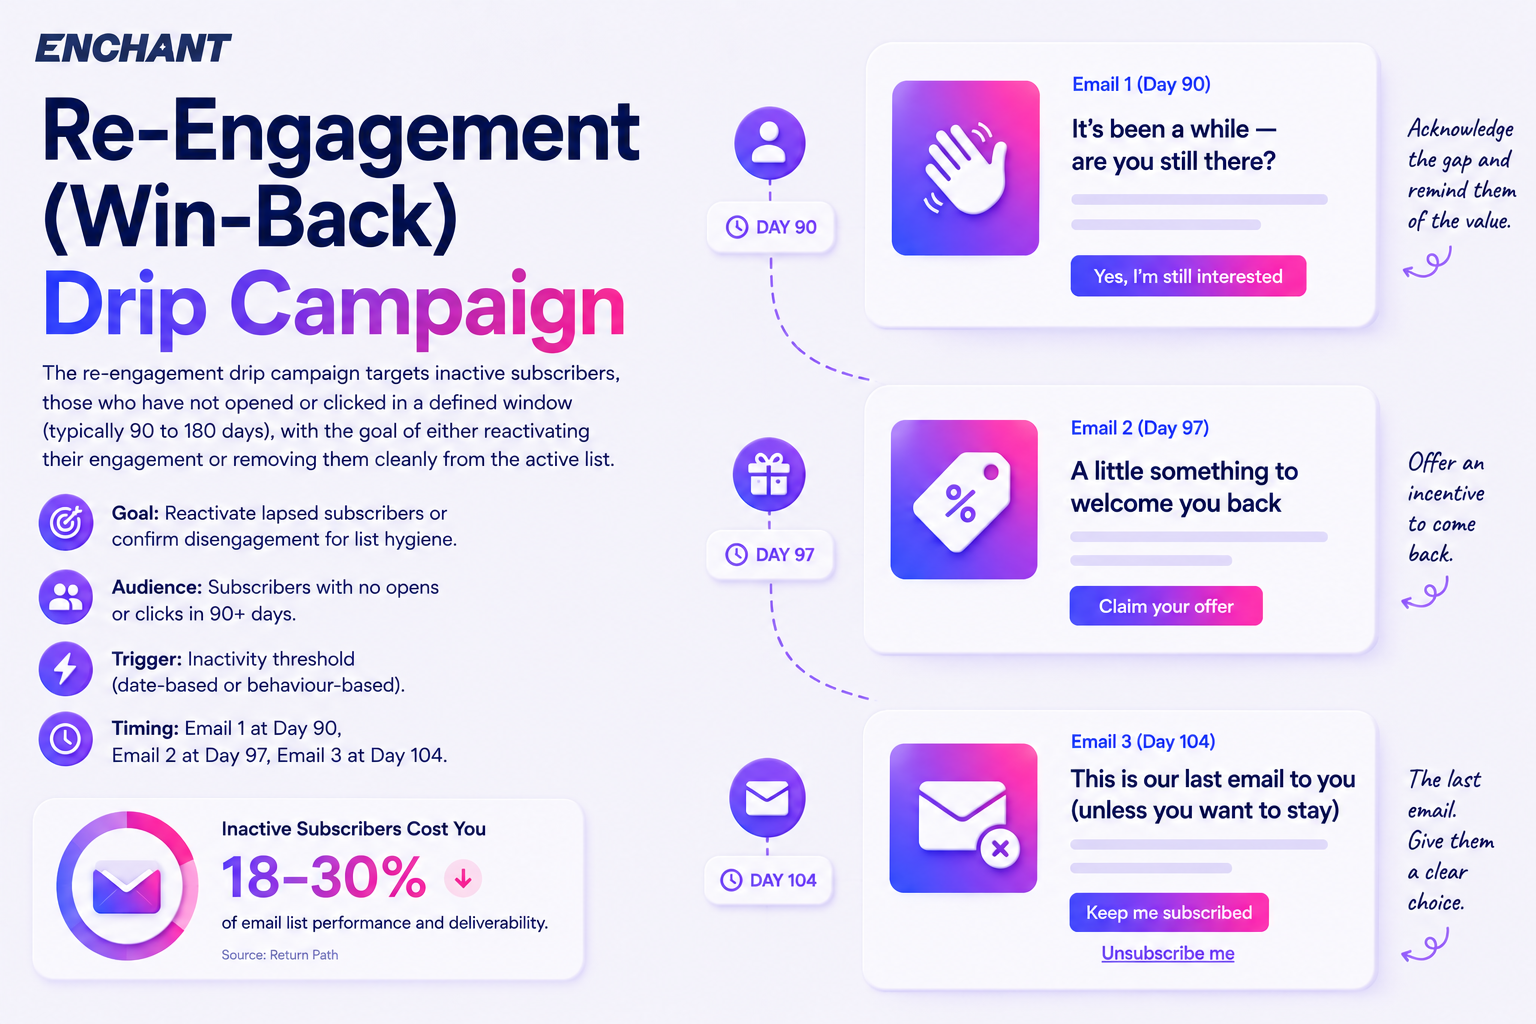
5. Re-Engagement (Win-Back) Drip Campaign
The re-engagement drip campaign targets inactive subscribers, those who have not opened or clicked in a defined window (typically 90 to 180 days), with the goal of either reactivating their engagement or removing them cleanly from the active list.
Goal: Reactivate lapsed subscribers or confirm disengagement for list hygiene.
Audience: Subscribers with no opens or clicks in 90+ days.
Trigger: Inactivity threshold (date-based or behaviour-based).
Timing: Email 1 at Day 90, Email 2 at Day 97, Email 3 at Day 104.
Email 1 (Day 90) — We miss you
Subject: "It's been a while — are you still there?"
Body: Acknowledge the gap. Remind them of the value they signed up for. No hard sell.
CTA: "Yes, I'm still interested" — a preference centre link or a single click-to-confirm.
Email 2 (Day 97) — An incentive to come back
Subject: "A little something to welcome you back"
Body: Offer a discount, a free resource, or exclusive access. Make it worth their attention.
CTA: "Claim your offer."
Email 3 (Day 104) — The last email
Subject: "This is our last email to you (unless you want to stay)"
Body: Plain text. Tell them this is the last email if they do not engage. Give them a clear way to stay subscribed. No guilt-tripping.
CTA: "Keep me subscribed" and a secondary link: "Unsubscribe me."
The win-back campaign has a dual purpose. Yes, you want re-engaged subscribers. But you also want to clean your list. Subscribers who do not respond to a three-email re-engagement sequence are hurting your deliverability. Suppress them. Your sender reputation will thank you, and your active list will perform better across every other drip campaign you run.
Our guide to email marketing automation campaigns that boost conversions covers re-engagement flows alongside a full review of which automations to prioritise first.
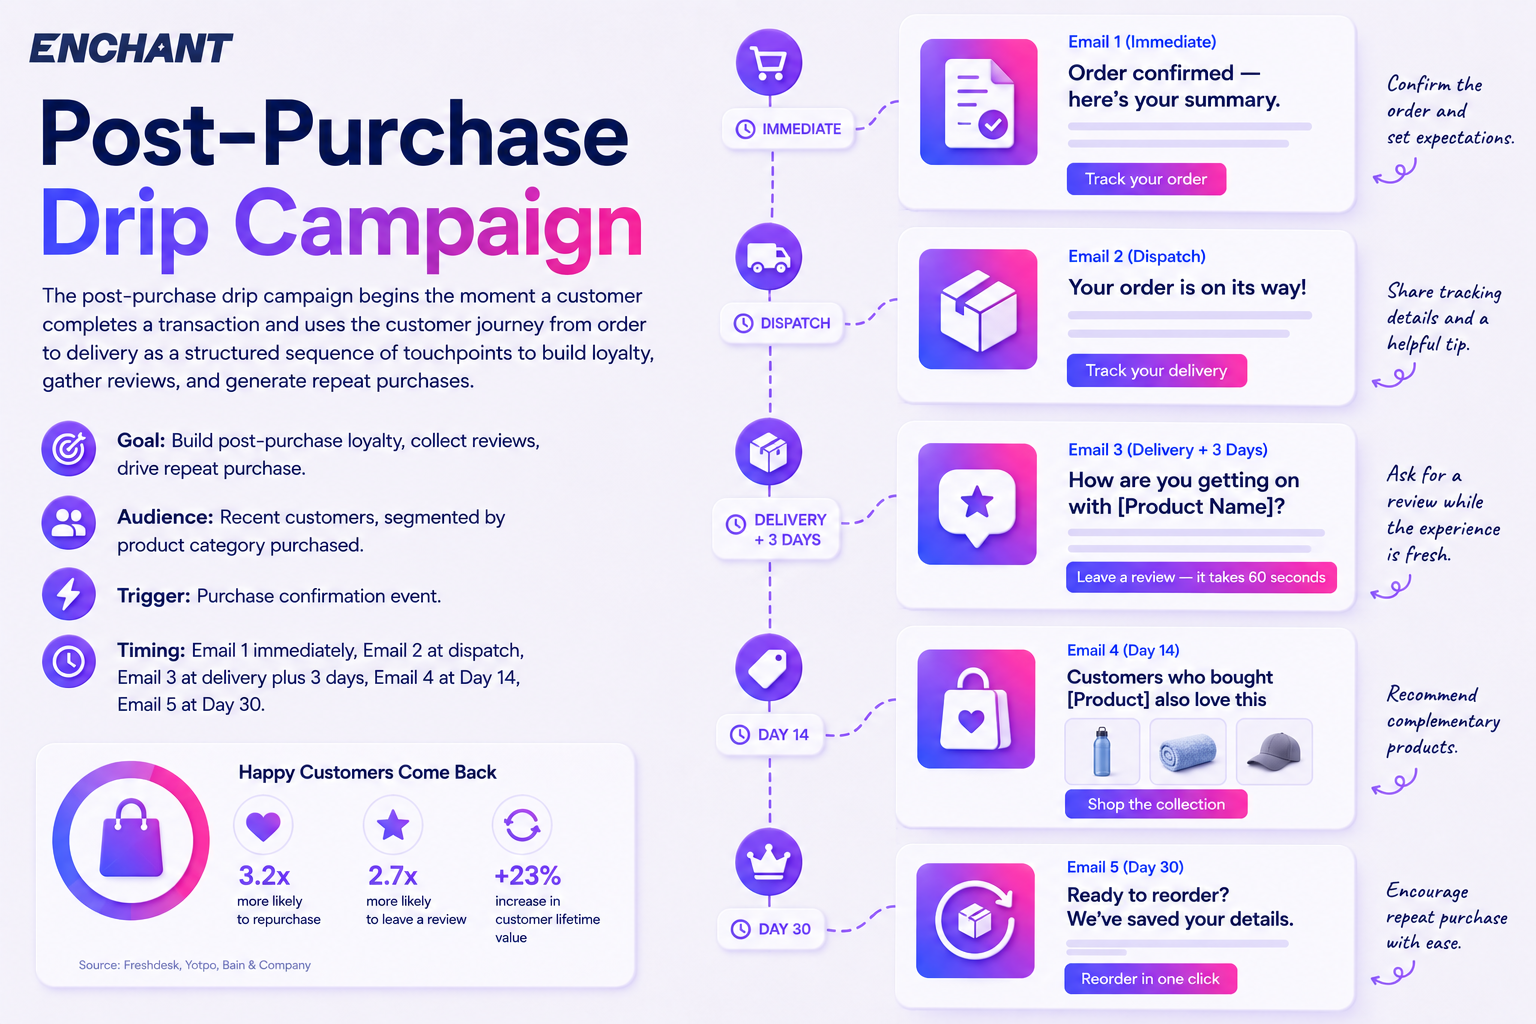
6. Post-Purchase Drip Campaign
The post-purchase drip campaign begins the moment a customer completes a transaction and uses the customer journey from order to delivery as a structured sequence of touchpoints to build loyalty, gather reviews, and generate repeat purchases.
Goal: Build post-purchase loyalty, collect reviews, drive repeat purchase.
Audience: Recent customers, segmented by product category purchased.
Trigger: Purchase confirmation event.
Timing: Email 1 immediately, Email 2 at dispatch, Email 3 at delivery plus 3 days, Email 4 at Day 14, Email 5 at Day 30.
Email 1 (Immediate) — Order confirmation
Subject: "Order confirmed — here's your summary."
Body: Order details, delivery estimate, contact information for support. Clean and functional.
CTA: "Track your order."
Email 2 (Dispatch) — Shipping notification
Subject: "Your order is on its way!"
Body: Tracking link. Expected delivery window. One product care tip or usage suggestion relevant to what they bought.
CTA: "Track your delivery."
Email 3 (Delivery plus 3 days) — Review request
Subject: "How are you getting on with [Product Name]?"
Body: Ask for a review. One sentence. Keep it easy, link directly to the review form.
CTA: "Leave a review — it takes 60 seconds."
Email 4 (Day 14) — Cross-sell
Subject: "Customers who bought [Product] also love this"
Body: Two or three complementary products based on purchase history. Personalised by category.
CTA: "Shop the collection."
Email 5 (Day 30) — Loyalty and repeat purchase prompt
Subject: "Ready to reorder? We've saved your details."
Body: Replenishment prompt (for consumables) or new arrivals in the category they bought from.
CTA: "Reorder in one click" or "See what's new."
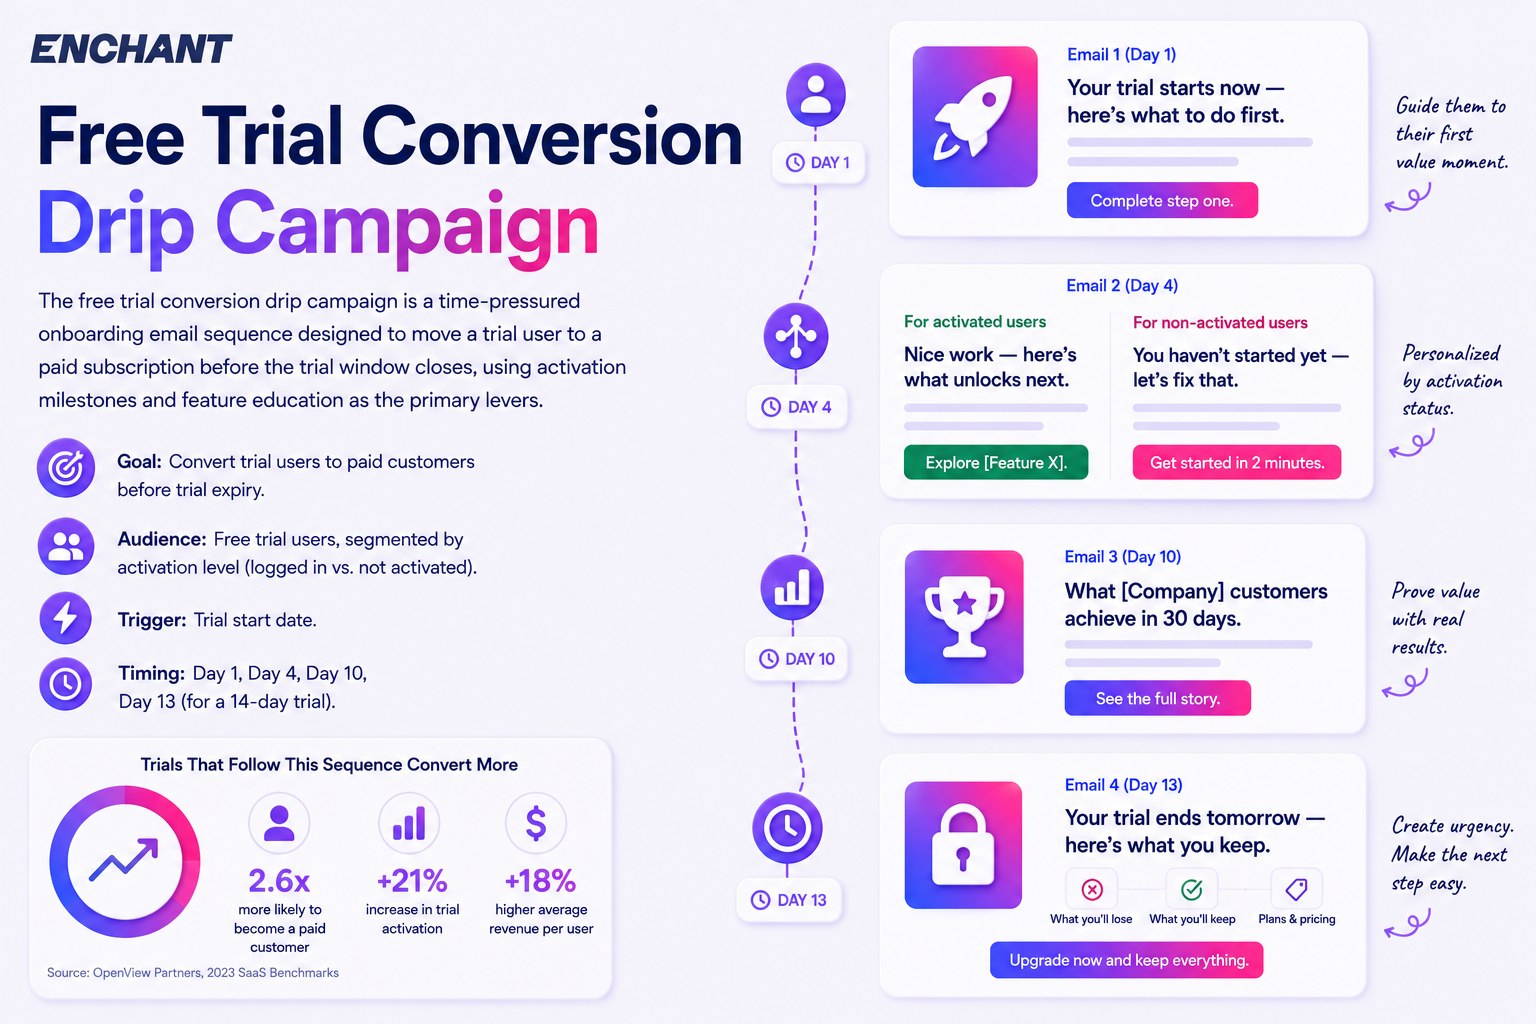
7. Free Trial Conversion Drip Campaign
The free trial conversion drip campaign is a time-pressured onboarding email sequence designed to move a trial user to a paid subscription before the trial window closes, using activation milestones and feature education as the primary levers.
Goal: Convert trial users to paid customers before trial expiry.
Audience: Free trial users, segmented by activation level (logged in vs. not activated).
Trigger: Trial start date.
Timing: Day 1, Day 4, Day 10, Day 13 (for a 14-day trial).
Email 1 (Day 1) — Welcome and fastest path to value
Subject: "Your trial starts now — here's what to do first."
Body: One specific action. Not five. One. The action most correlated with activation.
CTA: "Complete step one."
Email 2 (Day 4) — Milestone email (behaviour-triggered)
Subject: For activated users: "Nice work — here's what unlocks next."
Subject: For non-activated users: "You haven't started yet — let's fix that."
Body: Branch by activation status. Celebrate progress or address the barrier.
CTA: Activated: "Explore [Feature X]." Not activated: "Get started in 2 minutes."
Email 3 (Day 10) — Value proof
Subject: "What [Company] customers achieve in 30 days"
Body: Specific outcome data from real customers. One stat or one story.
CTA: "See the full story."
Email 4 (Day 13) — Convert with urgency
Subject: "Your trial ends tomorrow — here's what you keep."
Body: What they lose at expiry. What they keep if they upgrade. Price and plan options.
CTA: "Upgrade now and keep everything."
Branching the Day 4 email by activation status is the single highest-impact change most SaaS brands can make to their trial drip campaign. It requires your marketing automation platform to pull activation data from your product, but that integration is worth building. A non-activated user at Day 4 needs a completely different message than an activated one. Sending the same email to both is a wasted automation trigger.
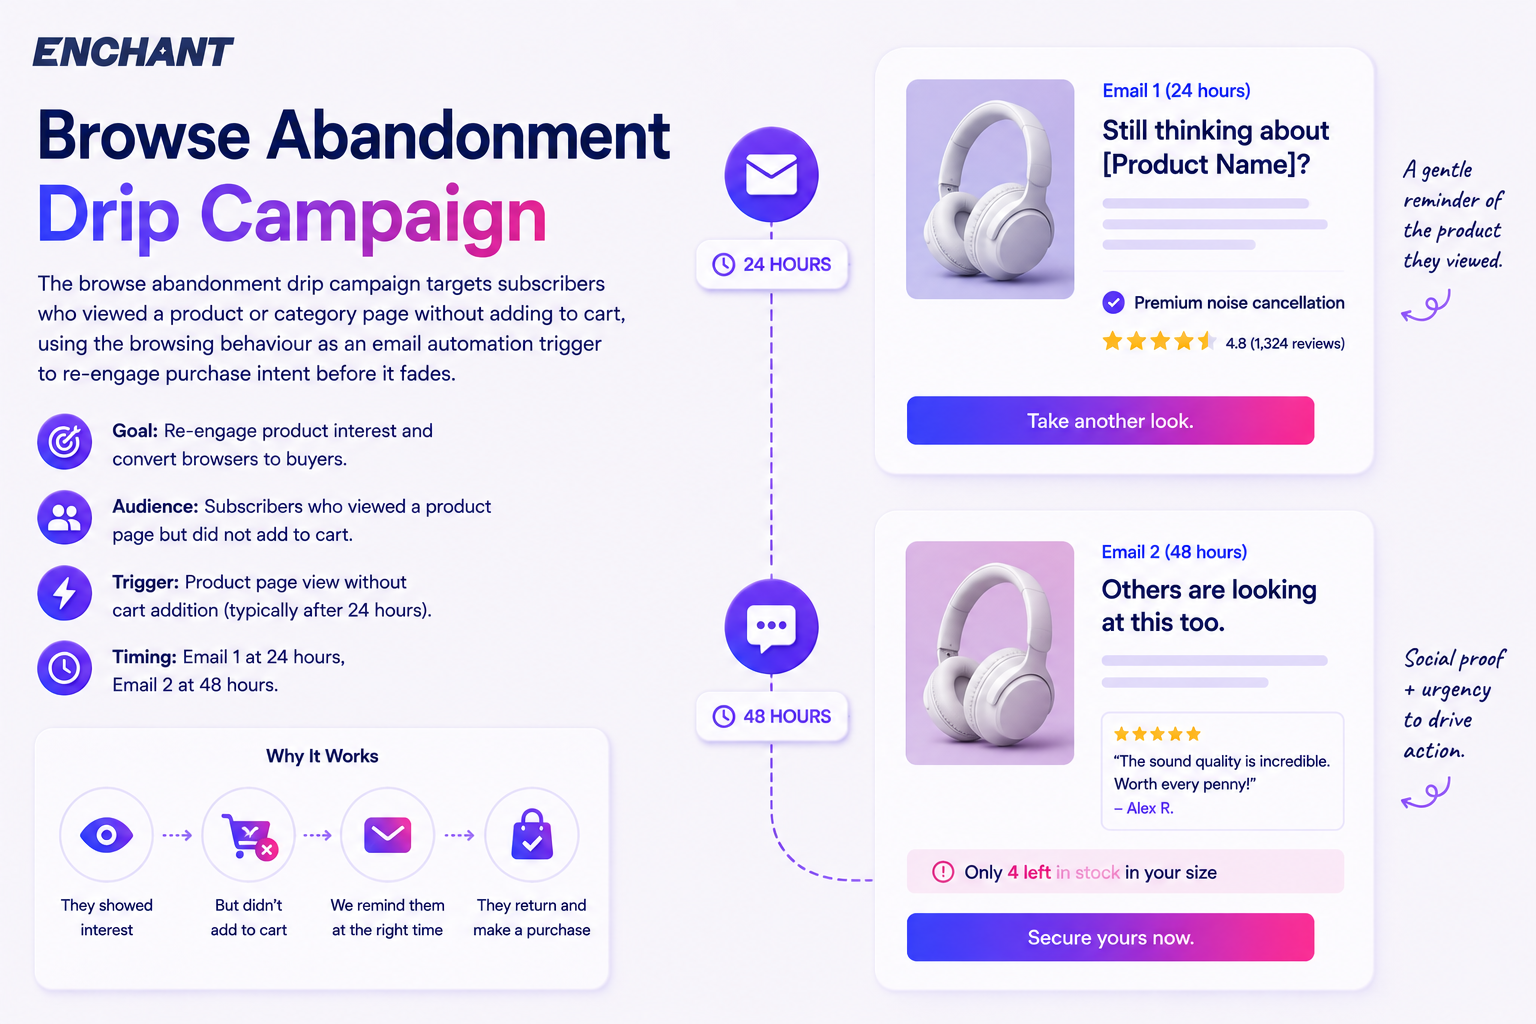
8. Browse Abandonment Drip Campaign
The browse abandonment drip campaign targets subscribers who viewed a product or category page without adding to cart, using the browsing behaviour as an email automation trigger to re-engage purchase intent before it fades.
Goal: Re-engage product interest and convert browsers to buyers.
Audience: Subscribers who viewed a product page but did not add to cart.
Trigger: Product page view without cart addition (typically after 24 hours).
Timing: Email 1 at 24 hours, Email 2 at 48 hours.
Email 1 (24 hours) — Gentle product recall
Subject: "Still thinking about [Product Name]?"
Body: Show the viewed product. One key benefit. Customer rating if strong.
CTA: "Take another look."
Email 2 (48 hours) — Social proof and stock nudge
Subject: "Others are looking at this too."
Body: Review snippet from a customer. Honest low-stock note if relevant.
CTA: "Secure yours now."
Browse abandonment is a lighter touch than abandoned cart. The subscriber has not committed to an item the way a cart abandoner has, so the email tone should match: curious and helpful, not urgency-heavy. Save the urgency for Cart Email 3.
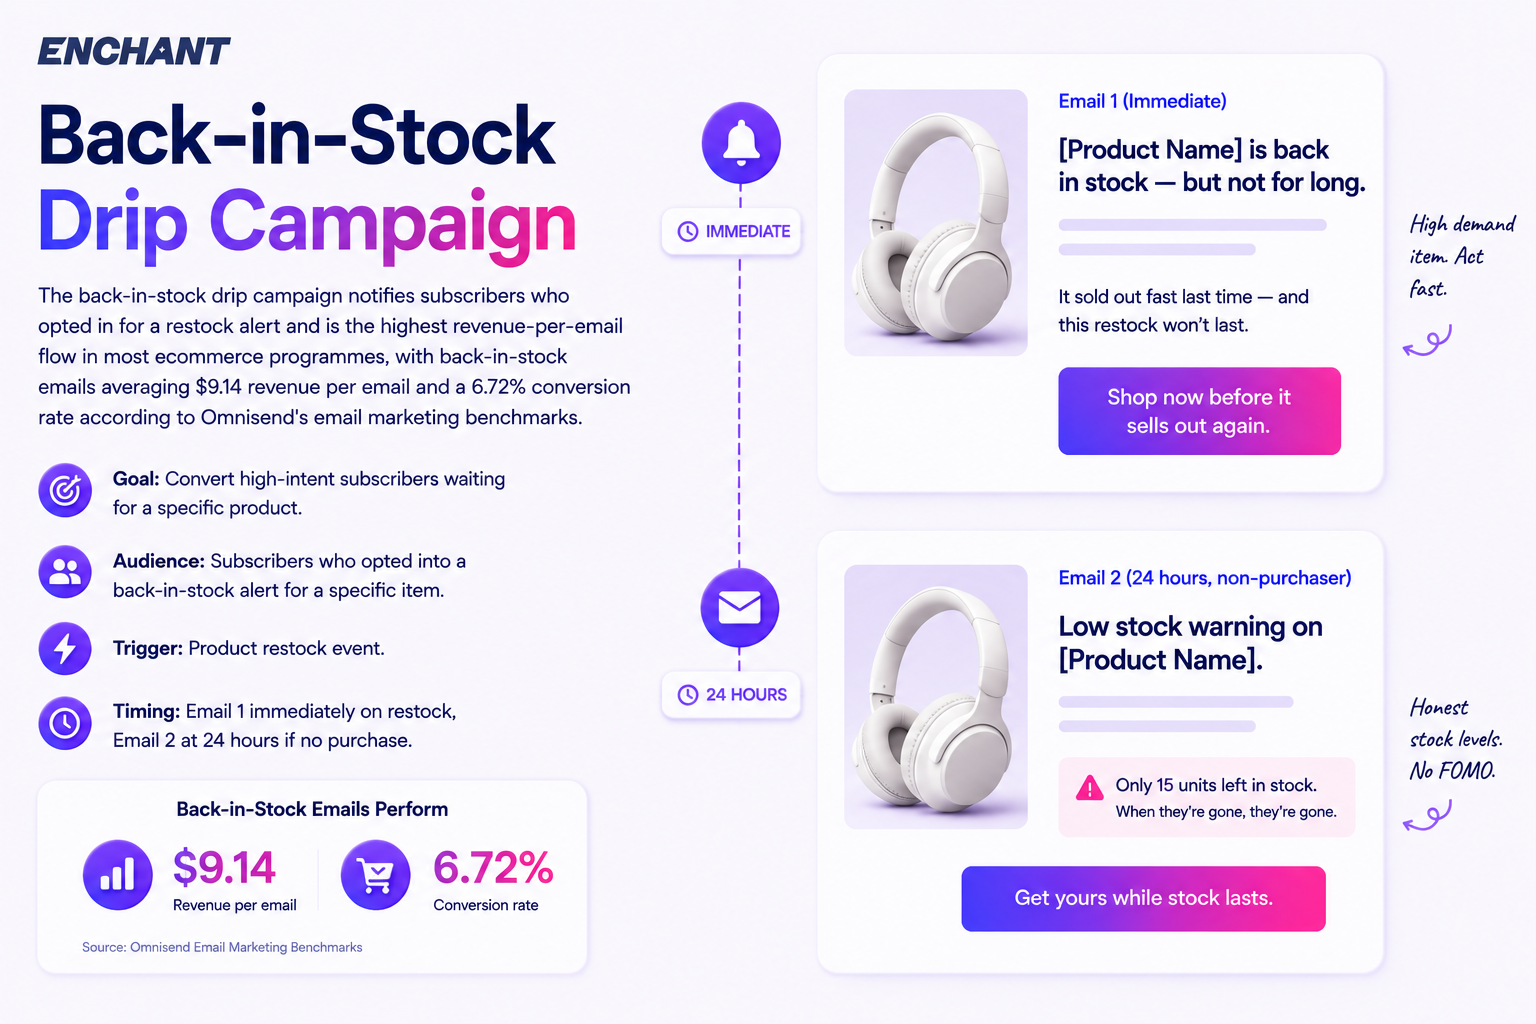
9. Back-in-Stock Drip Campaign
The back-in-stock drip campaign notifies subscribers who opted in for a restock alert and is the highest revenue-per-email flow in most ecommerce programmes, with back-in-stock emails averaging $9.14 revenue per email and a 6.72% conversion rate according to Omnisend's email marketing benchmarks.
Goal: Convert high-intent subscribers waiting for a specific product.
Audience: Subscribers who opted into a back-in-stock alert for a specific item.
Trigger: Product restock event.
Timing: Email 1 immediately on restock, Email 2 at 24 hours if no purchase.
Email 1 (Immediate) — It's back
Subject: "[Product Name] is back in stock — but not for long."
Body: Product image. Product name. One sentence on why it sold out. Direct link to buy.
CTA: "Shop now before it sells out again."
Email 2 (24 hours, non-purchaser) — Final alert
Subject: "Low stock warning on [Product Name]."
Body: Remaining stock level if honest. No invented scarcity.
CTA: "Get yours while stock lasts."
Do not exaggerate stock levels. Subscribers who opted in to a back-in-stock alert are high-intent. They do not need manufactured scarcity. They need an immediate, frictionless path to checkout. The CTA should go directly to the product page with their preferred size or variant pre-selected where your platform allows.
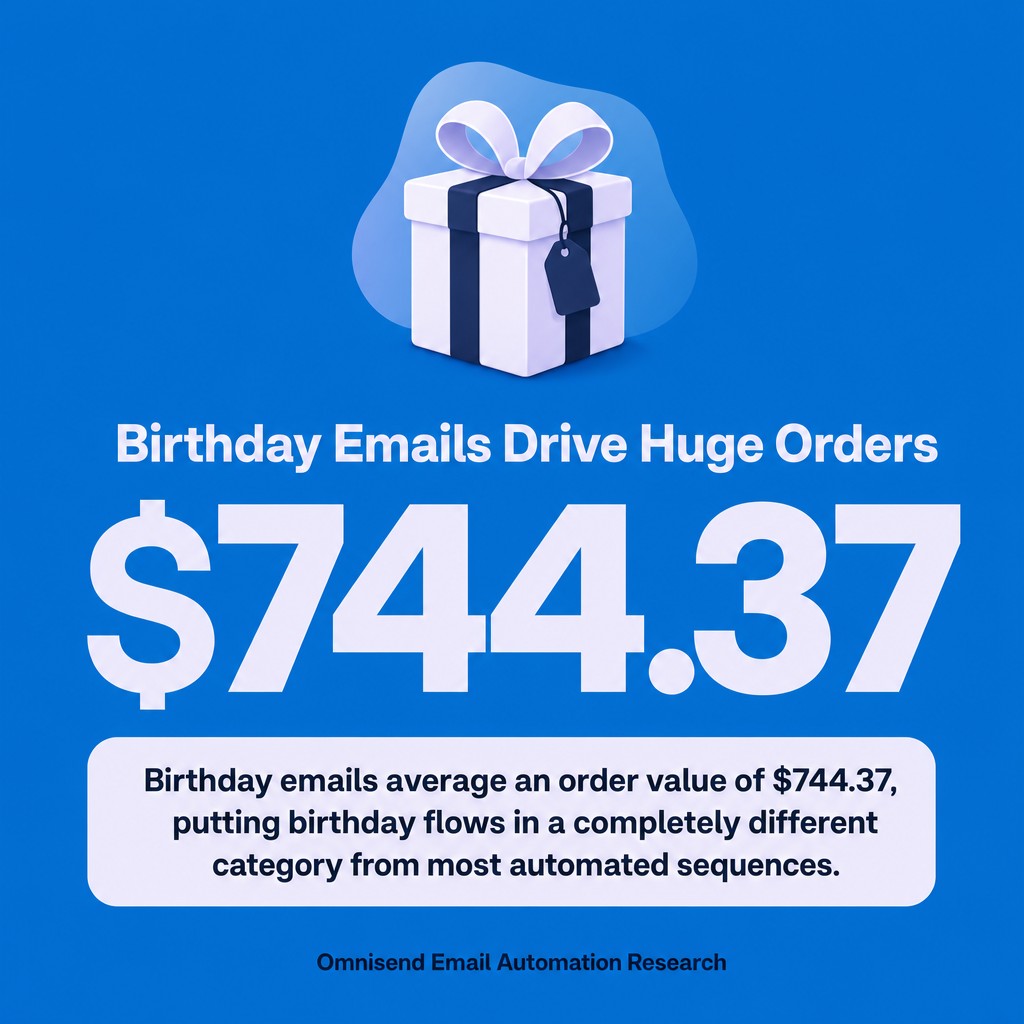
10. Birthday and Anniversary Drip Campaign
The birthday and anniversary drip campaign uses date-based email automation triggers to deliver personalised offers at a moment when subscribers are naturally primed to treat themselves, with birthday emails averaging an order value of $744.37 according to Omnisend's email automation research.
Goal: Drive a purchase with a personal, time-sensitive incentive.
Audience: Subscribers who have provided a birthday or who passed an anniversary milestone (e.g., one year as a customer).
Trigger: Date-based (birthday month or subscription/purchase anniversary).
Timing: Email 1 on the first day of the birthday month, Email 2 on the birthday itself, Email 3 at five days before expiry if unused.
Email 1 (Month start) — Early reveal
Subject: "Your birthday gift is waiting, [First Name]."
Body: Tease the offer. Build anticipation. Keep it short.
CTA: "Reveal your gift."
Email 2 (Birthday) — Full delivery
Subject: "Happy Birthday! Your [X]% off is ready."
Body: Deliver the offer. Product recommendations personalised to purchase history.
CTA: "Shop your birthday discount."
Email 3 (Expiry reminder) — Last chance
Subject: "Your birthday offer expires in 5 days."
Body: Urgency. Short copy. Restate the offer.
CTA: "Use it before it's gone."
The order value data on birthday emails is striking. An average of $744.37 per order puts birthday flows in a completely different category from most automated sequences. The reason is simple: these subscribers opted in with their date, they expect something personal, and they are in a self-purchase mindset. Match the email design to that expectation. This is not the place for a generic template.
How to Create a Drip Campaign: 5 Steps
Building a drip campaign that performs requires five steps in the right order, because skipping the audience definition step and going straight to writing emails is the most common reason drip campaigns underperform.
Our dedicated guide to building email drip campaigns covers the full process, but here is the architecture.
Step 1: Define the Trigger and Audience Segment
Every drip campaign starts with a trigger, the specific action or date that fires the first email. Define this first. Then define the audience segment: who meets the entry criteria, and who should be excluded.
Exclusions matter as much as inclusions. An abandoned cart sequence should exclude customers who purchased in the last 24 hours (perhaps from a different device). A re-engagement campaign should exclude customers who bought recently. Build the suppression logic before you build the emails.
Step 2: Map the Customer Journey Stage
Each drip campaign belongs to a specific stage in the customer journey: awareness, consideration, purchase, retention, or reactivation. The stage determines the tone, the CTA intensity, and the frequency. An awareness-stage lead nurturing sequence needs educational content and soft CTAs. A retention sequence needs social proof and reward. Match the sequence design to the stage.
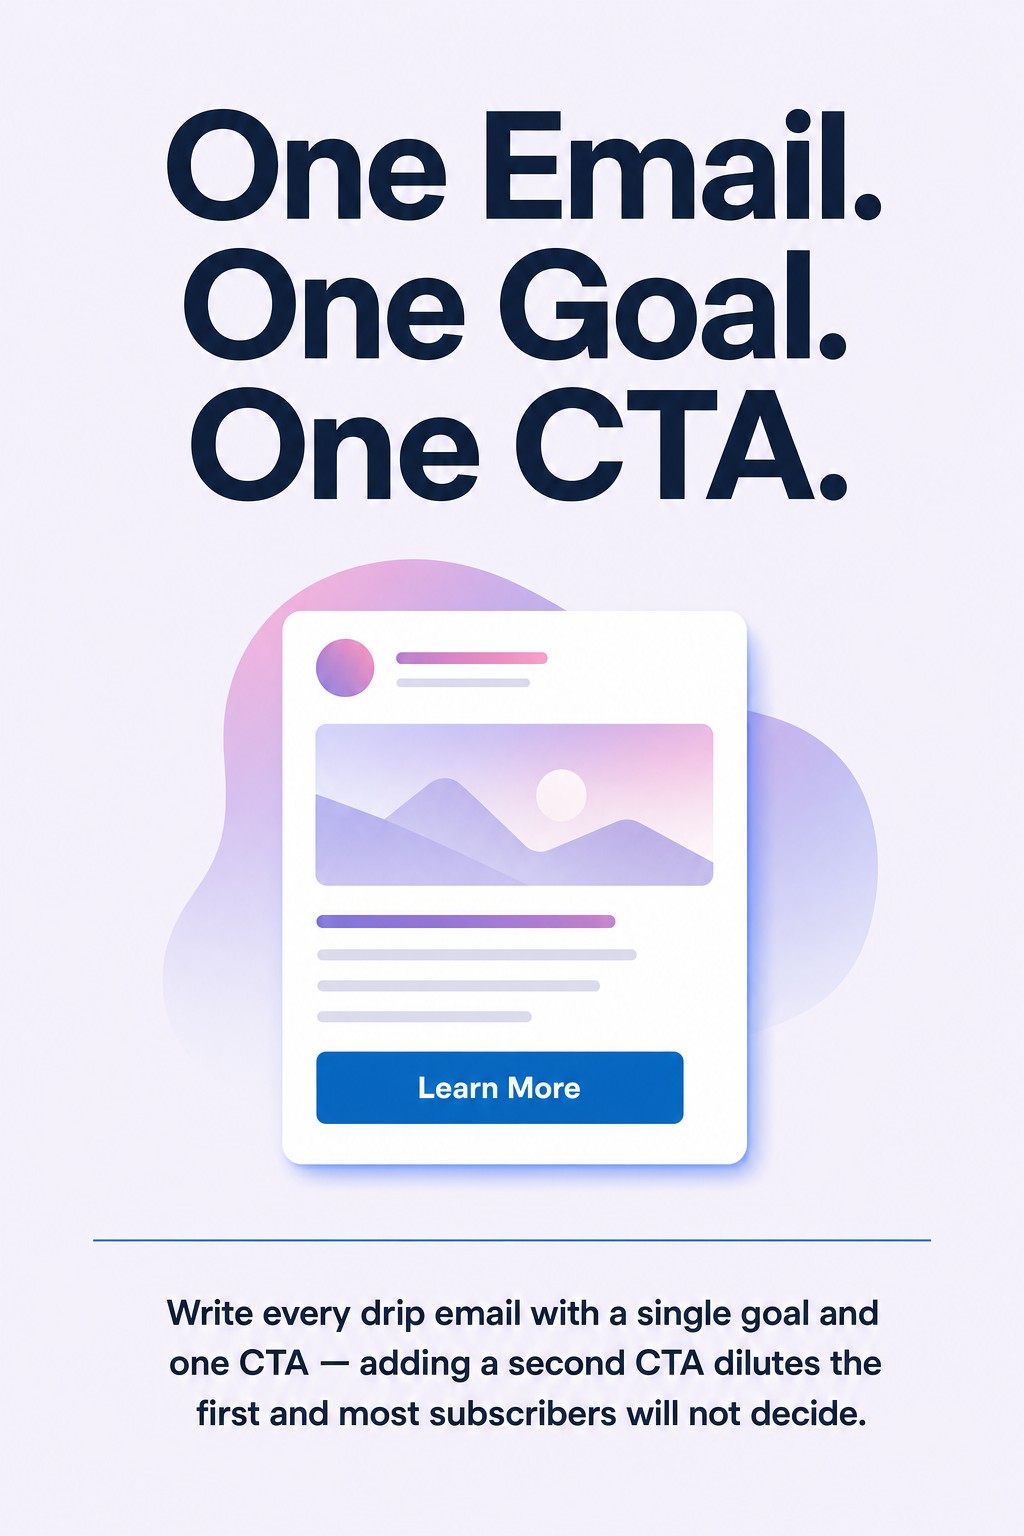
Step 3: Write Each Email with a Single Goal
One email. One goal. One CTA. This is the most frequently violated rule in email drip campaign design. Every email in the sequence should do one thing: introduce the brand, deliver social proof, present an offer, or ask for a conversation. As soon as you add a second CTA, you dilute the first. The subscriber now has to make a decision, and most of them will not.
Step 4: Build and Test the Sequence in Your Marketing Automation Platform
Set the sequence up in your marketing automation tool, whether that is Klaviyo, HubSpot, Braze, or Mailchimp. Test every automation trigger by running a live test with your own address. Confirm the delays are correct. Confirm the suppression logic fires. Check the emails render correctly on mobile, because most of your subscribers will open on mobile, and a broken layout kills a well-written sequence.

Step 5: Set Your KPIs and Review Cadence
Define what success looks like before you launch. For most drip campaigns the primary KPIs are open rate, click-to-open rate (CTOR), conversion rate, and revenue per email. Set a review date at 30 days post-launch. Do not make changes before you have statistically meaningful data. A sequence with 50 sends is not ready to optimise. A sequence with 500 is.
A note on open rates: they are increasingly unreliable as a standalone metric because Apple Mail Privacy Protection pre-loads email content, artificially inflating opens. Apple Mail accounts for roughly 46% of email clients according to HubSpot's email open rate benchmark analysis. Use CTOR and conversion rate as your primary performance signals instead.
Drip Campaign Best Practices
The drip campaign examples above work in principle. Whether they work in practice depends on execution decisions that most brands get wrong the first time.
Sending the same email to your entire list is a thing of the past. Drip campaigns exist to solve that problem. But a surprising number of marketers build a drip campaign and then do not segment the entry criteria tightly enough, ending up with an automated sequence that is barely more relevant than a broadcast.
Audience segmentation is non-negotiable. The automation trigger gets people into the sequence. The entry criteria determines whether those people belong there. Use behavioural data, purchase history, and zero-party data (preferences collected directly from subscribers) to sharpen both.
Personalisation means more than a first name. Dynamic content blocks that pull in the specific product a subscriber browsed, the category they buy from most, or the city they are in convert at higher rates than a first-name merge tag on an otherwise generic email. Build personalisation into the template logic, not just the subject line.
Do not over-email. A drip campaign with seven emails in seven days is not more effective than one with four emails spread across fourteen days. Fatigue is real. If a subscriber receives too many emails in your sequence before they have converted, they disengage from the sequence and potentially from your brand. Monitor unsubscribes by email position in the sequence to spot where the drop-off happens.
Subject lines are the entry point to everything. All the careful CTA work and email copy is irrelevant if the subject line does not earn the open. Test subject line length, question versus statement formats, and personalisation tokens. For subject line frameworks built for retail and D2C brands specifically, our guide to powerful email subject lines is worth reading alongside these drip campaign examples.
Exit conditions matter. A subscriber who converts mid-sequence should exit the drip campaign immediately. If someone purchases in response to Email 2 of the abandoned cart sequence, they should not receive Email 3 offering them a discount on something they just bought. This sounds obvious. It is also one of the most frequently missed configuration details in marketing automation setups.
Making Drip Campaigns Work for Your Strategy
Drip campaigns are not a bolt-on tactic. They are the infrastructure of a retention-led email programme. The welcome email drip campaign, the abandoned cart sequence, the lead nurturing flow, the onboarding email series, and the re-engagement win-back campaign are the five sequences every brand should have running before they invest in any campaign email.
Welcome and abandoned cart emails alone made up 76% of all automation-related orders in 2025 according to Omnisend's email automation research. Build those two first. Build them well. Then layer in the others as your programme matures.
The ten email drip campaign examples above are starting frameworks, not finished sequences. Your brand, your audience segment, and your specific customer journey will shape how each plays out. Start with the trigger. Define the goal. Write one email at a time. And do not launch anything you have not tested thoroughly in your own inbox on your own phone.
If you want help building or auditing the drip campaigns in your programme, our email automation and flows service covers the full lifecycle from strategy through to build and ongoing optimisation. Or if you are at the stage of mapping what automations to prioritise first, our email marketing strategy planner is a free resource worth downloading before you write a single email.


.webp)


